
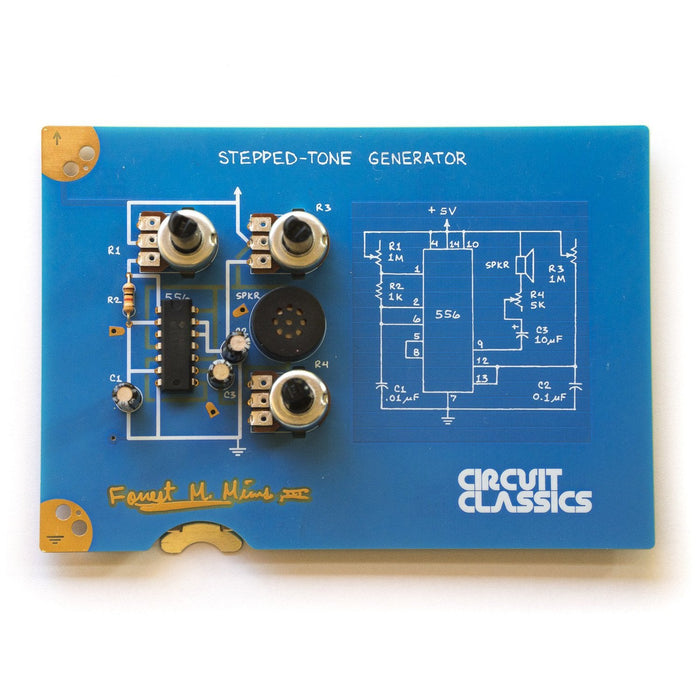
Circuit Classics: Stepped Tone Generator
This circuit gained a life of its own, jumping from the pages of the 555 Timer IC Circuits Engineer's Mini-Notebook and out into the world as the storied Atari Punk Console. Well-known for enabling the creation of sounds just like classic Atari console games from the 1980s, it provides a fun audio-centric project, as well as an interesting introduction to digital circuitry, feedback, and oscillators.
About This Project
Forrest M. Mims III is a trusted name in the electronics world for good reason: his charming and engaging texts have drawn millions of people into the world of electronics for the first time. I have brought three of those hand-drawn circuits projects to life by creating an exquisitely designed series of finely crafted and highly detailed boards. These are the Circuit Classics. They make a great gift for a first-time learner, an expert tinkerer, or even just as a fun conversation piece for your desk.
— Star Simpson
In The Kit
- 1 x Stepped Tone Generator PCB
- 1 x Alcohol Prep Pad
- 1 x Battery Clip
- 1 x 556 Integrated Circuit
- 1 x 1kΩ Resistor
- 2 x 1MΩ Potentiometer
- 1 x 5kΩ Potentiometer
- 1 x 10μF Capacitor
- 1 x 0.01μF Capacitor
- 1 x 0.1μF Capacitor
- 1 x Speaker
- 1 x Black Alligator Clip
- 1 x Red Alligator Clip
- 4 x Rubber Foot
- 1 x Wooden Stand
Required Tools
You'll need a couple of additional tools and materials in order to put this kit together: a soldering iron, and solder. You may like a "third hands" for holding the board while you working on it- or, if you like, you can use the wooden stand to hold the board while you solder. Batteries are not included in the kit, and you can choose to use the alligator clips to hook up a battery or power supply of your choosing, or you can assemble the SMT Battery Clip to the reverse side, in which case you'll want to supply either a 3V 2032 coin cell battery or two 3V 2016s (to form a 6V stack).
Assembly Steps
Many circuit builders find it helpful to assemble the components from shortest to tallest on the board. Insert low, flat components first, such as the 556 chip or the 1k resistor. You may consider using the wooden stand to hold the board at a pleasing angle while you solder it. After fully inserting the resistor, bend the leads so that it stays in place while you turn the board over to solder it. Insert the 556 chip - be careful to align the notch at the top of the chip with the notch in the outline on the board, as it is easy to solder a chip rotated 180° - and solder the #1 and #8 pins of the chip to ensure that it is fully inserted and held in place, then solder each of the next legs in order. After this, insert and solder the speaker, followed by the capacitors, and then, by each of the potentiometers. Then turn the PCB over, and as a final step, attach by soldering the SMT battery clip into place. If you like, you may also choose to clean the solder flux a bit using the alcohol pad, and you can assemble the included rubber feet either onto the circuit board (to give it a bit of grip laying flat) or onto the bottom of the wooden stand for long-term display.
Testing
Determine through trial and error which of the 3 potentiometers is the "volume" or gain knob. With this set to its maximum, adjust each of the other two potentiometers to characterize their effects. If increased loudness is desired from the circuit, use two 2016 3V batteries stacked to form a 6V pile, or a 9V connected via the alligator clips. To get a deeper understanding of the circuit, consider probing the test points with an oscilloscope while you adjust the potentiometers.
Notes
Contains small parts which represent a choking hazard. Not suitable for children younger than 12.
Please direct all inquiries and support requests here — inquiries will be answered within 72 hours
The Circuit Classics: Stepped Tone Generator appears in the following collections: